Do you remember when I wrote about helping edit a book my friend was writing? Well, he is finished and the book is finally released!!! Yay!! So exciting!
Right now it's only available as an e-book, you can find it here on Amazon. It's supposed to come out in hard copy form sometime in early 2015.
I am so excited for his accomplishment and am very happy I could be a help during the editing process.
I can't wait for book two in the series! :)
Saturday, December 20, 2014
Wednesday, December 3, 2014
Pretty Kitty
Little Sister's birthday is fast approaching. I made this little kitty for a gift for her.

The front is crocheted tightly with super fine yarn and a tiny hook. It was not easy on the hands! The pattern calls for making two and sewing them together, but after making the front I was not eager to repeat it. So instead I traced out the shape on some felt, cut it out and sewed the felt on for the back of the kitty.

I really enjoy the mixed material. It gives it a nice appearance and interesting texture.

I hope she likes it!
Monday, December 1, 2014
Nothing new.
I know it's been a long time since I've posted on here, but I haven't had anything worth while to write about. That, and I've been a little too busy to write.
I've got a few WIP's (work in progress) in crochet land. Been slowly picking up Christmas gifts for the people on our list. We celebrated Big Sister's third birthday not too long ago and are getting ready to celebrate Little Sister's first! Soon after that will be Christmas and then New Years already!
This past weekend everything we own seems to have stopped working or broke! ("Everything" is a bit of an exaggeration, but it sure feels that way.) Why do these things seem to always occur at the same time and not spread out throughout the year?! ;)
I hope you are all safe and warm! This cold weather has me wanting to put off all my errands that involve leaving the house! Have a great week everyone!
Thursday, October 30, 2014
Minion Hat
I have been busy this week with crochet orders. Three of them being minion hats.

There are a bunch of different patterns available on the Internet for minion hats but I decided to go with the one from Repeat Crafter Me.
I have had positive experiences with her patterns in the past so figured it was a trusted source.

These are adult sized hats, which the instructions do include, but I found the hat to fit a bit small so I did add an extra increasing row. You may want to keep this in consideration if you are planning to try this pattern out. The directions are clear and easy to understand and best of all, it's a free pattern!
Halloween is just around the corner. Big sister is going to be a lady bug and little sister will be a lion. I hope you all have a safe and fun Halloween!
Halloween is just around the corner. Big sister is going to be a lady bug and little sister will be a lion. I hope you all have a safe and fun Halloween!
Monday, October 20, 2014
Rake Necklace Holder
The wonderful world of Pinterest sparked my desire to make a necklace holder out of a rake. So, one weekend while I was visiting at the farm, I took a stroll through the old garden shed, and found a beat up rake that just happened to be missing it's handle. And when I say "took a stroll" I really just mean I walked up to the shed and it was the first thing I saw sitting on the bench right beside the door. It must have been just as eager to become my next project as I was!

I wrapped twine around the handle to polish off the look and so I could make a way to hang it up.


So I brought it home and scrubbed it clean. There were some areas where the old paint was chipping off, so I used some sandpaper just to smooth out those spots. This rake must have earned its keep because it is bent and warped. I hammered some of the spokes to make it a bit flatter but I don't mind the used look so went ahead and painted it.
Here it is hung on the wall with my necklaces on it.
If you wanted to make one of these but don't like the bent look of an old used rake, you could always buy a new one and dismantle it. But this one was free, so I'm embracing the bends!
:)
Friday, October 3, 2014
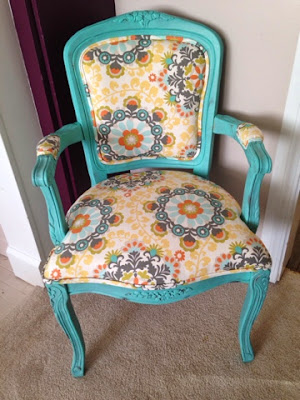
Louis Style French Chair Make Over
I'm done the chair! There were a couple minor hiccups but it's completed. I'm a perfectionist, and the little mistakes I do see drive me nuts, but, it's my first one, it was a learning experience, and now I know what I can do differently if I come across another one.


So without further ado...

First off, I removed all the old fabric and trim and old staples.

I did a rough sand job with 180 grit sand paper.
I decided to do a dry painting technique to give the wood an aged look. (3 coats of this.)

Once it was completely dry I went over some spots with 320 grit sandpaper to create some worn areas.

I used the old fabric to trace out my new material to fit the cushions, giving myself some extra room to pull the fabric while I stapled it to the chair. Once it was stapled in place, I trimmed the extra material off.
Next I used a stitch ripper to undo the old trim.

I kept the cord to make new double piping to trim the chair. I looked for instructions online to get a general idea of how to sew double piping. I found a tutorial explaining to sew the fabric around the first cord then folding the fabric around the second cord and sewing down the length again. I did this for the first few pieces of my double piping, but didn't like how my stitches weren't over lapping perfectly.

See? I'm a beginner sewer, so I'm sure someone with more experience would do a better job, but I decided to change my technique for the rest of the double piping.
I folded the fabric over the first cord, then layed the second cord over top of the fabric overhang, and wrapped the other side of the fabric over top of the second cord. I pinned it in place, then sewed down the length of the double piping only once, sewing both layers at one time.
Here's a picture to show what I'm describing.

This left me with one clean stitch line.

Much better!
To finish off the chair, I used a hot glue gun to attach the double piping to cover all the staples.
And voila!

Finished!
Too bad it's the end of garage sale season. It will probably be awhile before I come across another one of these chairs. I will have to keep my eye open for similar projects. Maybe an ottoman or something similar!
Hope you all have a fantastic weekend!
Tuesday, September 30, 2014
New adventures!
Hey friends! Want to see a sneak peek at my current project??

I'm so excited about this one!

I found this beauty at a thrift store! For $40! I had been dreaming about coming across a chair like this in hopes to make over into something fun and colorful and awesome!
I've had it for about a month and have finally started working on it. Stay tuned for the end result!
Friday, September 26, 2014
Dress Up Hat
The weather will be getting colder soon, hat season is coming! I was looking for a new hat to make for big sister. I came across the "Rapunzel" ones, with hair made out of yarn and braided in pig tails, and thought that would look so cute!

Well, I started looking for a pattern and then it dawned on me, I could make any beanie hat I wanted and then just add the yarn hair to the brim.
So here it is!

It looks SO cute on her. I even put it on little sister just for fun and she looked just like a cabbage patch doll.
The best thing about this hat is its multi purpose. Big sister can wear it outside to keep her head warm, but she can also wear it inside to play dress up!
Now I have to decide on a new hat for little sister. There's a few I like, so I have to narrow it down and pick one!
Monday, September 1, 2014
Freezer Meals
We are on holidays this week visiting friends. They are expecting their second baby next month and I wanted to return the favour of stocking up some freezer meals for them for after baby's arrival.

Freezer cooking is very easy. My favourite are crock pot meals. Just place all the ingredients in a large freezer ziplock bag. When you're ready to make the meal, thaw in the fridge overnight, dump contents of the bag into the crockpot and cook according to heat setting and time frame of the recipe!
If you want to see specific recipes, click on the links.
Have a great week everyone!
Another dear friend came out to help me get it all made.

We made a bunch of meatballs, Spaghetti sauce, chilli, breakfast burritos, BBQ chicken breasts, and Thai pork with peanut sauce.
Freezer cooking is very easy. My favourite are crock pot meals. Just place all the ingredients in a large freezer ziplock bag. When you're ready to make the meal, thaw in the fridge overnight, dump contents of the bag into the crockpot and cook according to heat setting and time frame of the recipe!
If you want to see specific recipes, click on the links.
Have a great week everyone!
Wednesday, August 27, 2014
A hat for Minnie
Yesterday I picked up my hooks and yarn again to make another hat. This one is for my Neice. My father gives nick-names to all his grand kids and my niece has been dubbed "Minnie" since the day she was born.


We have been extremely blessed to have received all of her clothes that she out grows and I am so appreciative!! It eliminates a huge expense to not have to buy clothing for a fast growing baby and toddler!
As a way to say thank you I decided to make her a Minnie Mouse hat. I adapted this pattern to fit a child.


Im sure she will look adorable in it!
Monday, August 18, 2014
DIY Hair Accessory Holder
If you have little girls like me, you are probably familiar with the piles of hair clips and head bands that accumulate all around your house! How about giving those hair accessories a place to call home?
 |
I made this hair accessory holder for free with things I had in my craft supplies.
What you need:
• Piece of cardboard (Mine is 17"x14.5")
• Scrap fabric big enough to cover the cardboard
• Scrap ribbons
• 4 hooks or paper clips
• Hot glue gun

Cut your cardboard to the size you want. (Keep in mind where you want to hang it.)
Iron out fabric to eliminate wrinkles. Wrap your fabric around the cardboard. Glue it to the back with the hot glue gun, working on opposite sides to keep the fabric stretched evenly. Fold corners as if wrapping a present and glue down.


Place ribbons on top of fabric covered cardboard to find desired arrangement. (You can iron your ribbons if you'd like them to look smooth. (I didn't bother ironing mine since I figured the hair clips would put creases in them anyways.)

Wrap ends of ribbon to the back of the board and glue down. Do not pull ribbons too tight, you will want a bit of space to pull the ribbon up when you put the hair clips on and off.

Use a spare ribbon or a long piece of yarn to hang the board on the wall. Glue ends of yarn (or ribbon) at the back top corners.
If you want to hang head bands on your board you can attach small hooks on the bottom of your board. I did not have any hooks nor did I want to run to the store so I used paper clips and bent them into hooks and added a shape on the ends.


Poke holes through the fabric and cardboard. Thread paper clip ends through. Bend paper clip at the back to run flat against the board and glue down.

Attach hair clips, hang the board and continue to attach hair clips as you find them randomly laying around the house! ;)
Wednesday, August 13, 2014
Angel Wings Photo Prop
Hello again! Here's another post about a friend who recently had a baby. Actually she had two... Twins! (All my friends seem to be pregnant or just recently had babies)
I was looking for something to make that would be cute for twins for baby pictures. I happened to stumble upon this darling angel wings pattern and decided I'd give it a try. Here's the results:

The babies are identical twin girls, but I decided to make the wings different colors to give them some individuality.

If you want to make these wings too, you can find the pattern here. You will need some experience reading crochet patterns and know your basic crochet stitches.
Happy stitching! :)
Monday, August 11, 2014
Blog Makeover!
If you stopped by the blog and thought you made a mistake and typed the wrong URL, don't worry!! No mistake made, this is the fresh face of "Addicted To Turquoise". I just wasn't totally loving the look of the blog, so decided I would change things up a bit. I'm not completely settled on this either, there is just something missing, but for now it will do. I'm liking the simplistic and clean look of plane old white. :)
Sunday, August 10, 2014
Pumpkin hat
A couple of my closest friends are pregnant and due around the same time! Must have been something in the water. ;)

I got a request for a pumpkin hat for newborn pictures. The baby should be here sometime in October. A pumpkin hat will be a perfect fall photo prop.

Wednesday, August 6, 2014
Swedish meatballs
Want a quick and simple recipe for a delishious sauce for meatballs? Try this one out. It's perfect to pour over mashed potatoes as a gravy too!

1 cup beef stock
1 cup heavy cream (milk works just fine)
3 Tbsp flour
1 tsp soy sauce
1 tsp pepper
1/2 tsp dried rosemary
Whisk together all the ingredients in a medium sized pot. Cook and stir over low-medium heat until thickened (about 10 minutes), stirring occasionally. Poor over your favourite meatballs and mashed potatoes.
For this recipe I use a half of a beef stock cube dissolved in a cup of water. I don't like opening a box of beef stock if I don't have a use for the leftovers. I also use 1% milk because that's what I always have on hand.
Monday, August 4, 2014
Upholstery project!
My friend is expecting her 2nd baby, and wanted to redo the rocker chair she has in her nursery. It was an old brown rocker with orange cushions. I volunteered to help her out and primed the chair for her and took on the task of recovering the cushions. I have never tried upholstery before but was excited to give it a shot. She picked out a lovely light grey fabric with polka dots on it.
 It gives you an idea of the color at least.
 This is the finished chair.
I didn't get a before picture but thought to snap a shot of the cushions after I already ripped out the stitches.

I washed the fabric, ironed out the wrinkles, used the old material as a pattern to trace on the new fabric and started cutting!
Once the fabric was pinned I started sewing and it took no time at all to finish!
My friend did not want to replace the buttons on the cushions and with this being my first upholstery job, I didn't think to compensate for the extra room this would make in the stretch of the fabric. So the top cushion ended up being a bit looser than I would have liked, but for my first attempt, I'm happy with how it turned out. Most importantly, my friend loves it, so I'm glad she is happy with the results!

Friday, June 27, 2014
First Read Through...
My friend won a writing contest, his prize... Having his very own book published!!!! How cool is that!

I was so honored when he asked me to be one of his first read throughs of his novel!
I had a late start getting to work on it, but I've started now and am loving it. It's funny how much longer it takes to read through a book when you are reading it with an editing frame of mind. You have to stop and re-read parts. Search back through the story to make sure facts line up. Make little notes along the way.

It's called "The Tournament of Hearts: The Librarian Gladiator" and it's a fantasy novel. I love fantasy books!
You can't tell by the picture but that is a huge stack of papers... So I better get back to work! :)
Sunday, June 15, 2014
Happy Father's Day!
For Father's Day this year, I put together a year of Daddy-Daughter Dates for my husband and oldest daughter. Little Monkey is now two and a half years old! She is at such a fun age that I figured it was the perfect time for her and daddy to start having one on one outings together.


Each date has an estimated price of how much that date will cost. Some are free and some cost money. I taped the last two pages of the book together to make an envelope to put money into so all the dates are "paid" for ahead of time. I called this the Daddy-Daughter Date Bank.


I found this super cute matchbook notepad at the dollar store. On each page I wrote the month, then what the date for that month was. My husband will pick which day of the month he wants to do the date.

Each date has an estimated price of how much that date will cost. Some are free and some cost money. I taped the last two pages of the book together to make an envelope to put money into so all the dates are "paid" for ahead of time. I called this the Daddy-Daughter Date Bank.

If one date costs less than what I estimated, the change can go back into the bank in case another date costs more than what I budgeted for.
I also added some Swap Out ideas. If one or two of the dates don't spark my husbands interest, there are some alternative date ideas that he could do in place of the one he doesn't like.
I think this will be a special tradition that my husband and daughters can do as they grow older. Plus, when daddy is out with one of the girls on a date, the other daughter and mommy can have one on one time too! :)
Happy Father's Day to all the Daddy's out there!
Monday, April 28, 2014
Kitty cat and Bunny rabbit


Just a couple of stuffed animals I made for my girls. They each got one in their Easter baskets. :)
Tuesday, April 15, 2014
Daisy Duck Hat
I had a special request to make this Daisy Duck hat for a special little girls 1st birthday present.

I found a pattern from the website Hopeful Honey. The pattern was for a baby hat, but I needed to make a bigger hat for a toddler. So I made a basic earflap hat for size 1-3 years and switched colors to purple where it seemed appropriate. I then followed the Hopeful Honey pattern for the eyes, beak and bow and attached them. The size of the appliqués fit great on the bigger hat.
Thursday, March 27, 2014
Waiting for a little gentleman...
I have a nephew due to be born any day now!

I made this photo prop set from a pattern I found on Ravelry. I think it will look so adorable for newborn pictures!
Can't wait to see him in it!
Friday, March 14, 2014
DIY detangler spray
My daughter's hair has grown quite long. She's always slept on her stomach so I've never had a problem with bad bed head in the morning. That is until recently!
 (Some mornings are worse than this)

She has started sleeping on her back and her long pretty locks have been getting very tangled.

She wasn't liking getting her hair brushed anymore because it was pulling and hurt! So I decided to try making a hair detangler spray instead of buying expensive store boughten ones.
Mix 1 part conditioner with 8 parts water. (Use hot water so the conditioner mixes in easily)
I have a spray bottle from the dollar store which was the perfect size for 1/4 cup conditioner and 2 cups water.

You can use whatever conditioner you have on hand. This is also like a leave in conditioner so you can use it on yourself as well! It doesn't weigh your hair down or make it feel greasy.
When I made it I told my daughter it was a special spray for her hair so it wouldn't hurt to brush it. She lets me spray it on and brush her hair with no resistance now! Her hair looks so shiny afterwards!
Tuesday, February 11, 2014
Lamb hat
While I was still pregnant, I made up this sweet little lamb hat in anticipation of the arrival of our baby girl. I found the pattern on Repeat Crafter Me, and loved it instantly.


Guess what?! Baby Girl HATES hats! I am so dissapointed! She is fine with one on if you are holding her up, but if she's in a car seat or laying down, every time she moves her head, the hat shifts and she is not impressed. I can't really blame her, it's not fun to have a hat shift over your eyes and then not be able to pull it off by yourself.
I'm hoping when she's a bit bigger she won't mind them as much.
Friday, February 7, 2014
Some baby stuff and a cake!
Hi strangers! I haven't been keeping up with my blog! 😮 My apologies!


Life with baby #2 is going great. Little Monkey loves helping take care of her baby sister and enjoys giving plenty of kisses each day.
A second baby makes life busier but I'm thankful to still be able to find some time to fit in crochet projects. I have even started babysitting again!
A couple projects I have yet to share on the blog include this baby sweater....

... and these sweet little wrap around baby booties...

Also, thanks to an amazing, wonderful, fantastic friend who stocked me up on freezer crock pot meals, I've been able to slack on my supper cooking duties and made this carrot cake instead! Ha!

I was surprised the other day when my hubby came home and requested a carrot cake. He's not usually a big fan but had developed a craving! I had never made carrot cake before, but now that I have (and know how much oil is in it) I am no longer disillusioned that it is a healthy cake! Lol!
Subscribe to:
Posts (Atom)