Sunday, March 29, 2015

Paper Flowers

Challenge 3 in the Creative Challenge I'm taking part of is paper flowers.
    
I made these coffee filter peonies following this tutorial.


I love how these flowers add a fresh Spring feel to my living room. They make me happy whenever I look at them. 


Flowers are lovely but can get expensive so I love that I could make these with supplies I already had on hand and they will last forever. I'm thinking I'll have to try some more paper flower tutorials to put in other rooms of my house.

Happy spring everyone!

Wednesday, March 11, 2015

Roasted Cauliflower

I normally just steam cauliflower or eat it raw with dip, but I wanted to try preparing it a new way to see if my kids would eat it.

I decided to try roasting it with seasonings and the result was a success. Both kids ate it! (Little sister only has 4 teeth, so she would only eat it after I blended it up into tiny pieces.) 


Ingredients:
-1 large head of cauliflower 
-1 tsp olive oil 
-1 tsp chili powder
-1 tsp cumin
-1/2 tsp paprika
-1/4 tsp salt

Wash and cut cauliflower into bite sized florets and place in large bowl. Toss cauliflower with olive oil. 
In a small bowl, mix seasonings. Pour seasoning mixture over cauliflower and toss to coat.
Bake cauliflower on a baking sheet at 450F for 20 minutes, turning every 5 minutes. Cauliflower should be tender and golden brown.

(This seasoning mixture is fairly mild. If you want a stronger flavor, increase the amount of spices you use.)


I'm going to experiment some more with different ways to make and season cauliflower. Some days it's a struggle to get the kiddos to eat their full daily vegetable serving requirements. Hopefully I can find some yummy recipes that they will love.


Friday, February 27, 2015

Water Color

Month 2 of the Creative Challenge is water color painting.

I haven't painted with water color since high school but I really enjoyed it when I did.

Here is the painting I did for the challenge...


 This is Little Sister when she was around 11 months old.

I hope to do another one of Big Sister so I can frame them and hang them up. I tried one already but I wasn't happy with it, so want to attempt a different one.

To make this painting I followed a tutorial that I found on the Grow Creative Blog.

This was really easy to do and very simple since it only involves 1 color! If you are a beginner water color painter, you will be able to do this. Check out the tutorial and give it a try!

Monday, February 9, 2015

Bandana Bibs

A friend of mine was wanting some bandana bibs for her baby boy. She asked me if I thought I could make some since she'd rather buy them from me than order from online.
I hadn't made them before but I was willing to give them a try! They turned out sooooo cute! 


These look so adorable on babies! Not only are they functional for keeping shirts protected from baby drool, but they look super fashionable too!

I'm so thankful to have great friends that support my crafty habbits! :)

Tuesday, January 27, 2015

Free book!

My friend just placed his book as a free download for the next 8 days only!!
If you've been wanting to read it, this is a great opportunity to check it out.

Tournament Of Hearts Book one in The Library Gladiator series

Saturday, January 17, 2015

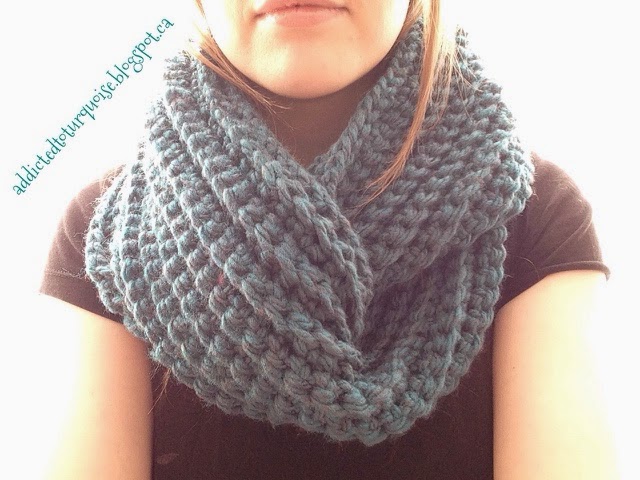
Chunky Ribbed Infinity Scarf

Here is my project for the month of January in the creative challenge I wrote about in my previous blog post.


I had a little bit of left over yarn from the chunky blanket I made and since I loved the teal color so much, I wanted to make a scarf with it.

This is a really simple crochet design but I love the look of the ribbing. I've seen this stitch used for sweaters/cardigans and I thought it would look so good as a scarf.
All it consists of is rows of single crochet made in the back loops only. Here's what you need to make one of your own.

Materials: 
-Chunky yarn (sorry I don't have a yardage amount as I just used left overs from a previous project) You can use more or less yarn depending on how wide you want to make your scarf.
-10mm crochet hook

Gauge:
- does not matter. Just make your scarf 60" long

Directions:
- R1- Foundation Single Crochet until you reach a 60" long chain. (Alternatively you could make a chain just longer than 60 inches then turn your work and single crochet back along the length of your chain.)
-R2- Chain 1, turn. SC in back loops only in each FSC (or SC).
-R2- Chain 1, turn. SC in back loops only in each SC.
- Repeat round 2 until you reach desired width of scarf.
-Leave long enough tail on finishing yarn to join ends of scarf into an infinity scarf. Make sure to not twist the scarf before you join ends. Use a whip stitch to join ends.

I made this teal colored scarf 5 inches wide.


I made another one in grey for a gift. The grey one is 6.5 inches wide.


Of course when I finished this scarf the weather warmed up from -35 with windchill to the pluses!!! Is it wrong for me to hope it gets cold again so I can wear this before spring comes?! Lol

I hope you all have a wonderful weekend!

Monday, January 12, 2015

Crafty Inspiration

I came across this blog encouraging creativity for the year 2015. The blogger, Michelle, has proposed a craft each month for this year, so 12 in total. She has also outlined what each month's craft medium will be and gives a few ideas that you could pick from.

I love being creative and I like the challenge of doing a specific art form each month. I am excited to take part in this. But I'm not sure I can limit myself to one a month! Lol!

If you want to get involved as well, go check out her blog post. Month one is in progress.

Let's get creative!